
This tutorial describes all the necessary steps for you to use the OwnTracks app with Mosquitto MQTT Broker and [Home Assistant](https:// www.home-assistant.io) as a device tracker. Since I have not made my Home Assistant accessible via the Internet, I use the Mosquitto MQTT Broker . If you have a direct connection to Home Assistant, you can also use the OwnTracks component to use.
Requirements
- Installed Home Assistant Server
- Installed Mosquitto MQTT Broker -> Tutorial
- Installed OwnTracks App on your smartphone
The commands used in the tutorial are partly Gentoo Linux specific. You have to adapt those accordingly to the distribution you are using.
Mosquitto Benutzer anlegen
We need to create a user for Home Assistant in the Mosquitto broker:
mosquitto_passwd /etc/mosquitto/pwfile hass
I call my user “hate”. Of course you can use any name you like.
We then have to create the users for all OwnTracks clients. For this tutorial I create the user “otclient”.
mosquitto_passwd /etc/mosquitto/pwfile otclient
Once all users have been created, Mosquitto must be restarted:
/etc/init.d/mosquitto restart
Connect OwnTracks to Mosquitto
After we have installed OwnTracks on our smartphone, we still have to set the connection data to our Mosquitto broker. Based on this tutorial, I am assuming that Mosquitto can be reached from the Internet with SSL encryption via port 8883. If you use other ports, these must be adjusted accordingly.
We open the OwnTracks app and go to the settings under “Connections”. It should look something like this (Android):
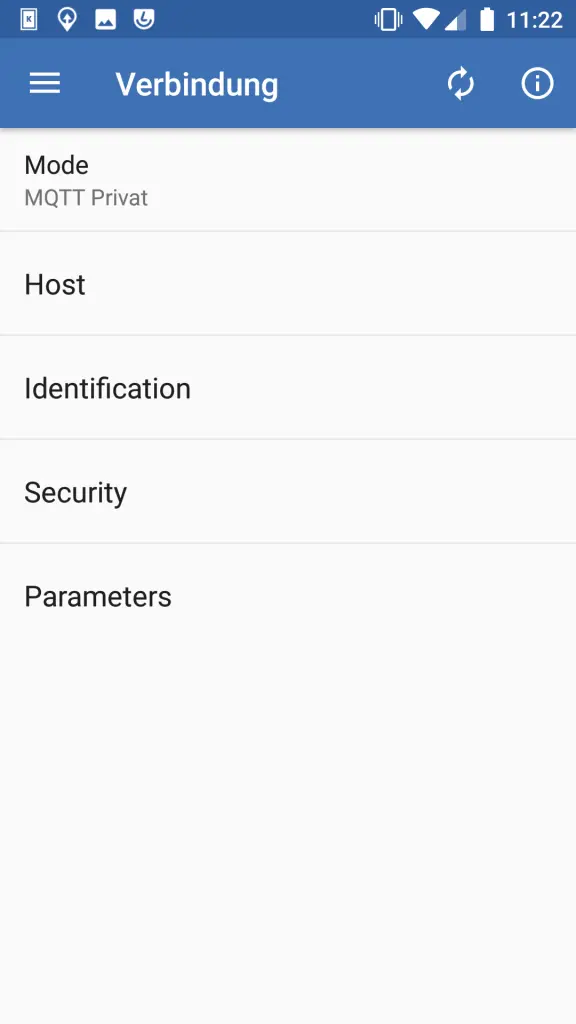
With “Mode” the connection is set to “MQTT Private”. The next step is to set up the “host”:

Enter the address of your Mosquitto broker under “Host”. Enter your port for port, in my case 8883. “WebSockets” are deactivated.
After that we change our “identification”:

Here we enter the user that we previously set up in Mosquitto. In my case this is “otclient”. For the “Device ID” you enter any name under which the device can be found. Under Tracker ID we can enter two letters, e.g. your own initials. Ultimately, however, these are only displayed on the map in OwnTracks.
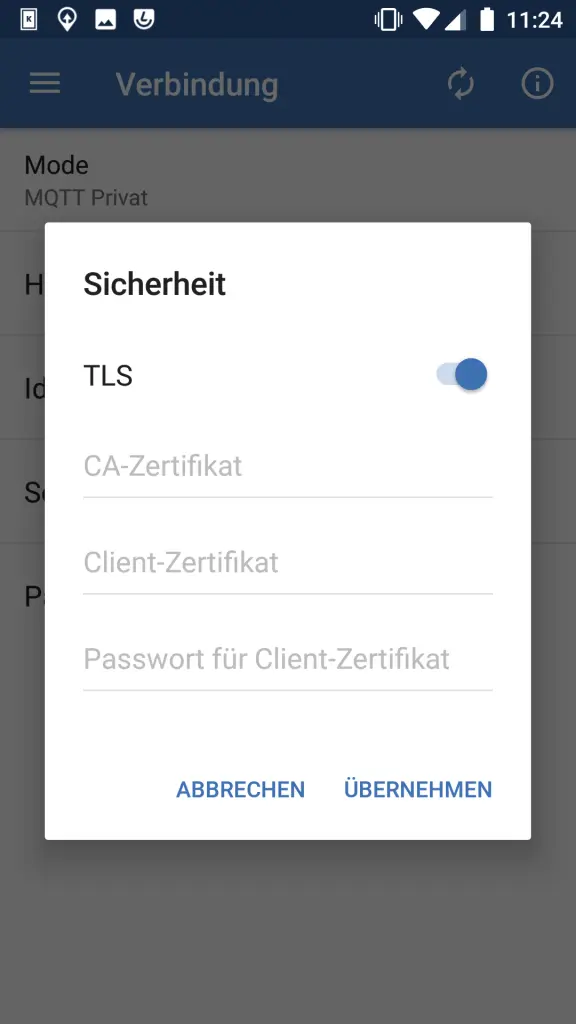
Finally, we activate the encrypted connection under “Security”:
To check if we have everything set correctly, we press the info icon at the top right to see the connection status. If everything is ok, it should look something like this:

If no connection is possible, check your data again for correctness.
OwnTracks für Home Assistant anpassen
In the standard configuration of OwnTracks (Android), the setup under Home Assistant did not work for me at first. I then found what I was looking for in the OwnTracks manual. Under “Settings -> Configuration Management” “mqttProtocolLevel” must be set to 4.
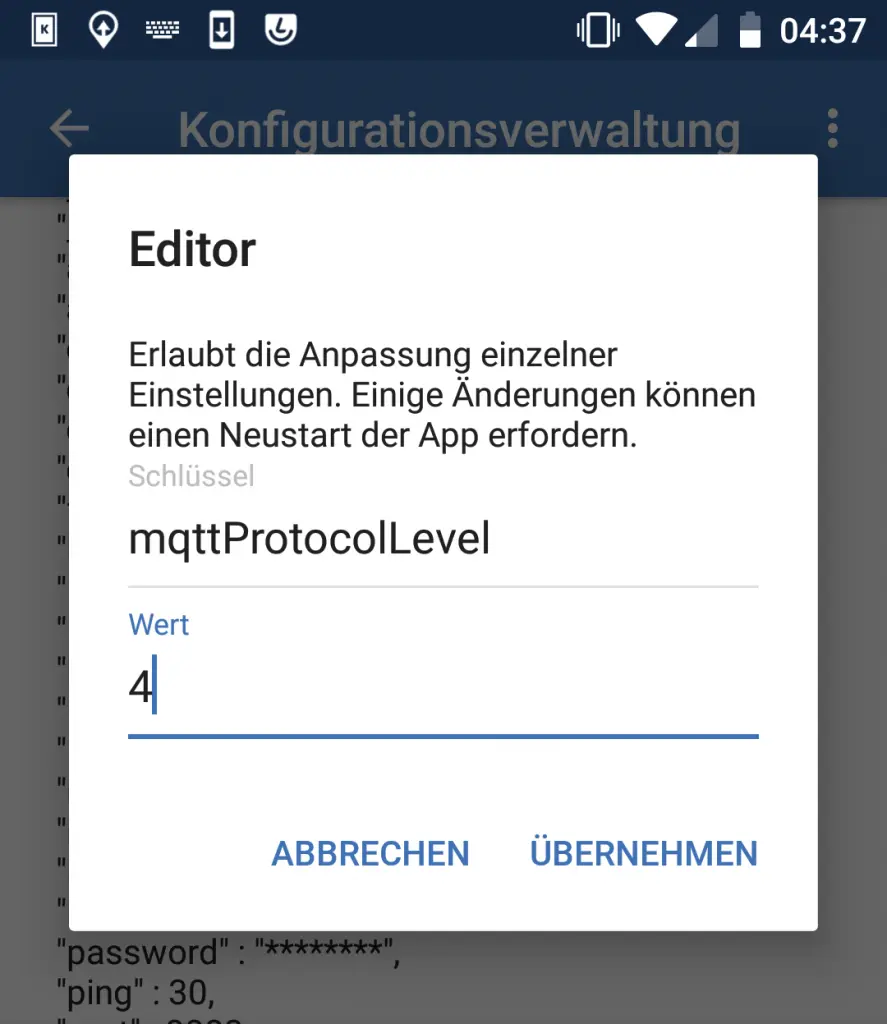
Then restart OwnTracks! This is easy to do in the configuration editor.
Test connection to Mosquitto broker
Now we check whether we are also able to send the current location to our Mosquitto broker with OwnTracks. For this we start a Mosquitto Sub:
mosquitto_sub -h localhost -p 1883 -t "owntracks/#" -v -u USERNAME -P PASSWORD
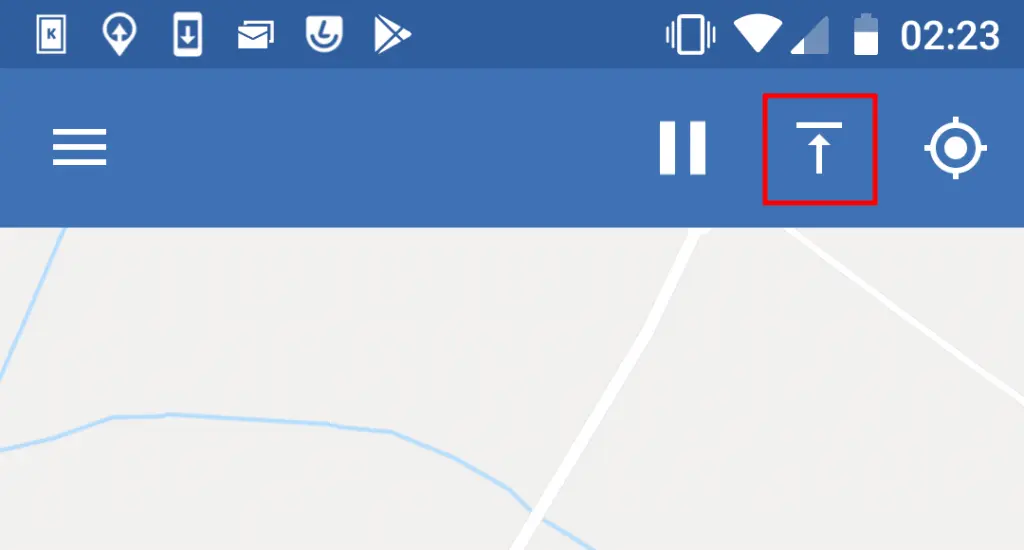
I run the command on my system on which the broker is running. If the broker is on a different system, you must enter your host name/IP instead of “localhost”. The port for the local unencrypted connection is 1883 for me. Replace “USERNAME” and “PASSWORD” with your login data. I simply took the “hass” user that we created earlier. If all information is correct, we can see incoming messages. To trigger a message from OwnTracks we press the upload button in the main window of the app.
Then a message similar to this should appear in the console in which we started the sub:
owntracks/otclient/androidphone1 {
    "_type":"location",
    "acc":1787,
    "alt":0,
    "batt":62,
    "conn":"w",
    "lat":49.635325,
    "lon":7.6567407,
    "t":"u",
    "tid":"e1",
    "tst":1545787405,
    "vac":0,
    "vel":0
}
If everything has worked up to here, we can continue with the integration in Home Assistant.
mqtt:
  broker: localhost
  port: 1883
  username: USERNAME
  password: PASSWORD
  client_id: "hass"
The data above must be adapted to your needs. With this we have set up our Mosquitto MQTT Broker in Home Assistant.
Now let’s add OwnTracks to our “configuration.yaml”:
owntracks:
  max_gps_accuracy: 200
  waypoints: true
  mqtt_topic: "owntracks/#"
  events_only: true
After restarting Home Assistant, our OwnTracks devices should appear in the file “known_devices.yaml”:
otclient_androidphone1:
  hide_if_away: false
  icon:
  mac:
  name: otclient
  picture:
  track: false
So that the device is also tracked, we change the entry accordingly and set the “track” parameter to “true”.
otclient_androidphone1:
  hide_if_away: false
  icon:
  mac:
  name: otclient
  picture:
  track: true
This completes the setup of OwnTracks in conjunction with a Mosquitto MQTT Broker and [Home Assistant]( https://www.home -assistant.io) completed successfully.
Conclusion
With this we have at least made the basic functions of OwnTracks usable, namely the tracking of devices. But there are other things you can do in conjunction with Home Assistant and OwnTracks such as the zones/places in both match systems. The Home Assistant or OwnTracks Help can help here.